M
Contents
Markercon: Media Composer to DS Marker ConverterTip to keep mattes from canceling out other mattes
Creating mattes on DS may be faster than launching Photoshop
How to create a Matte Effect using Graphics
How to share Mac Drives with Windows computers
How to read and write NTFS drives with a Mac
Media Composer Import
Media Composer Lockup on closing
Media Manager
Media Log
Media Backup
Media Purge
Monitor Setup
Morphing Text
Missing Media
Multicam Editing
MXF Media
Markercon: Media Composer Marker to DS Subtitle Converter
TIP TO KEEP MATTES FROM CANCELING OUT OTHER MATTES
(DSlist_bm - 12/11/06)Quick hint: You might find it useful to first draw a shape (a
box or something) somewhere off the screen, as the first shape you draw.
Turn on it's Fill Outside and set it to 0. This gives you a "clean
canvas" to work on. Then all your subsequent shapes, draw with only
"Fill Inside" turned on set to 100 (or whatever).
This way you can treat all of your "main" matte shapes the same, since
the dummy shape is there doing a job but is out of the way. You can
then keep adding other shapes, deleting them, etc. without having to
worry about which shape is now on the bottom of the stack so it's
attributes can be set properly.
Creating mattes on DS may be faster than launching Photoshop
A Case StudyI gave a guy a bunch of images to cut out and create alphas for. He's been doing Graphic Design for many years (the last few years on DS). He asked me where PS was on his machine. I showed him how to achieve the cutout on DS faster than he could launch PS, create the cutout, export the file, import into DS.
- Apply the Matte effect,
- Choose the polyline tool
- Encircle the object.
- Verify the matte.
- Keep editing.
He was in his comfort zone using PS for image manipulation and DS just for (2D) compositing. I pushed him out of his comfort zone to learn a new workflow. He's now happy using the DS workflow.
(Thanks to Tony Jover)
How to create a Matte Effect using Graphics
In Graphics:
- Select the Polyline tool (Q)
- For Paint Style turn off Brush and turn on Fill (B and N)
- For Fill - set it to Reveal if you want to erase, or Color Blend if you want to paint
- For Masks, set to Alpha only
Q: If I want to add two mattes in the same effect where the second overrides the first. Is there a simple setting for this?
A: You have to think about what you're doing.
If you start with a clip from tape for instance, then it will already have solid alpha. So your first stroke is going to probably be something like an inverted Reveal fill. If you now want to add some more alpha somewhere else, the next stroke wants to be not-inverted, and wants to be a color blend, so that you're painting with alpha.
How to share Macintosh drives with Windows computers
Please note: Mediafour's MacDrive does not work with Windows XP-64. It does work with Vista. It does work with 32-bit Windows.
OS X 10.5
A tip from Bob Maple:
Samba is the 'file server' for Windows (and Macs can use it too amongst themselves). I imagine when you create through the GUI it might be dynamically configuring the Samba config, but I've always edited the config myself since in the past there seemed to be no way to do it through the GUI.
If you want to get your hands dirty... Open a Terminal, and type sudo su - When it asks for the password, enter the same password you use to login to the machine with (and I'm assuming your account is an administrator account.) If you use no password to login, just hit return.
Then type pico -w /etc/smb.conf to edit the config. You can pretty much leave the [global] section alone. At the end, just add what shares you feel like. Examples from my own setup:
[Media] public = no path = /Volumes/Media writeable = yes guest ok = no [Projects] public = no path = /Volumes/Projects writeable = yes guest ok = no
When done hit [Ctrl]-X and then S to save.
Troy Thompson offers the following tutorial for OS X 10.5:
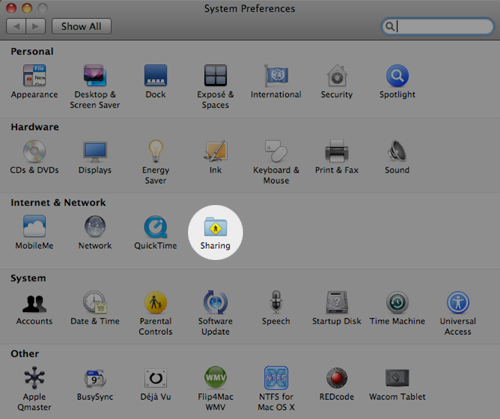
- 1. Create a folder for shared storage. Open the System Preferences and Click the Sharing Preference.
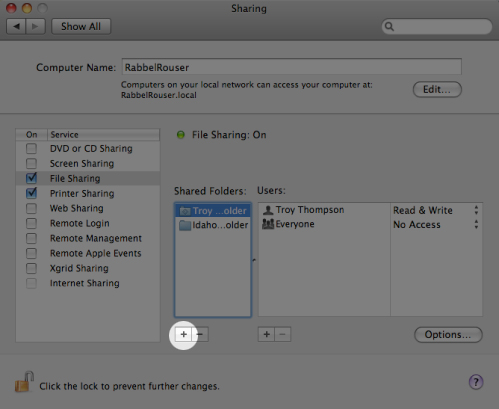
- 2. Click the "+" under the Shared Folders and navigate to the folder you created.
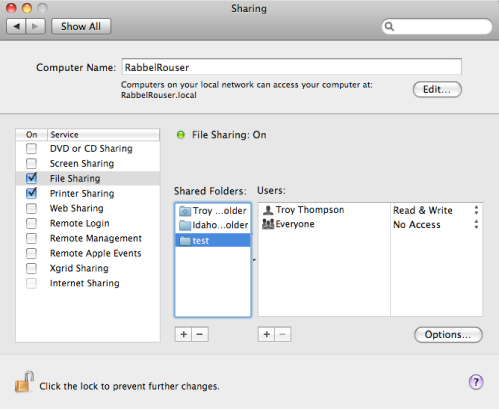
- 3. Select the folder and set the User Preferences. For my situation it was important that "Everyone" was set to No Access which disables Guest access and forces a login on the PC side.
- 4. Choose the "Options..." button. These are options applied to the entire group of Shared Folders.
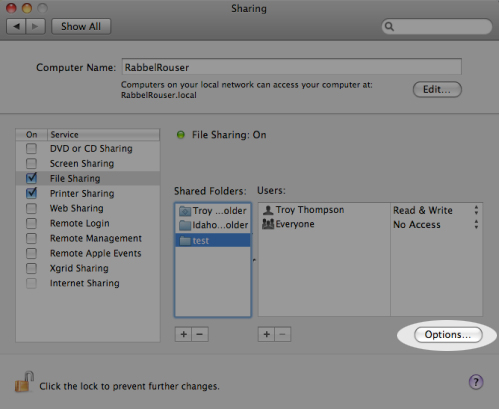
- 5. Make sure to select "Share files and folders using SMB" and enable the accounts you want to be shared. If you've decided to enable Guest access, the individual accounts listed below don't actually need to be enabled.
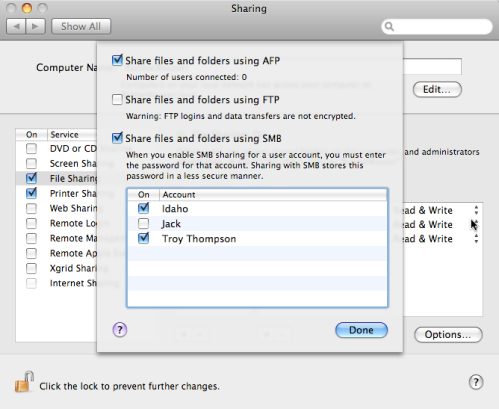
- 6. On the PC, go to Network Places and click entire network. Navigate to the workgroup the Mac is setup under and double click the computer. If Guest access is disabled, you'll need to enter the account user and password. You'll now have access to the user's Drop Folder and the share that you've created.
Comment from Troy:
It actually took a couple of times setting those permissions to get it to work – and as far as I can tell – doesn’t work when the share is on the desktop (but that might have been just a wrong set of permissions). I didn’t explain it above, but I actually setup my shares to work under the same workgroup as the DS – with a separate user. Doing this keeps my files locked under my OS X user, which is important to me when we have freelancers in the house. This way I write all my renders to the shared folder, and import them directly within the Symphony or DS.
OS X 10.4 and below
Michael Horn's Sharepoints is an excellent application that makes it easy to add and delete share points like in the old (System 9 and below) Finder. This program makes it easy to share any folder. In addition SharePoints also brings back users and groups management to Mac OS X as well as easy configuration of AppleFileServer (AFS) and Samba (SMB) Server (for Windows) properties.
How to get a Macintosh Computer to read and write NTFS drives
Apple's OS X 10.4 (Tiger), 10.5 (Leopard), and 10.6 (Snow Leopard) can read NTFS drives formatted on a PC running Windows NT, 2000, XP, Vista or Windows 7. It cannot format those types of drives and cannot write to them, save on a local area network through SMB file sharing. So if you have a client who has given you a portable drive or a thumb drive and you need to get your Macintosh to write to it, you have a problem.
Tuxera offers a solution. NTFS for Mac allows any Mac to read and write to NTFS drives. The application can be freely downloaded and will work for 15 days. Registration is available for €25.00 for one person. If you have a three-person shop, you'll need three licenses.
If you are running Snow Leopard's 64-bit kernal, NTFS for Mac will not work. You must be in the 32-bit kernal or use a Mac with Leopard. Tuxera may support 64-bit Snow Leopard in the near future.
MEDIA COMPOSER IMPORT
Export AAF from Media Composer
- Ask the editor to NOT consolidate the sequence.
- Forget embedded media - that's for when you're using shared media drives.
- Ask for the project as well so that you can make your own AAF from that project using Medialog if needed.
- Make explorer clips as well as timeline clips - they can be very useful sometimes.
- Capture from Timeline with handles sizes you are comfortable with.
- If I need any more handles when slipping a shot against the offline, simply select that clip on the timeline and select "Recapture Selection With Options" and give it bigger handles.
Notes:
- CCs from MC do not come across completely intact, depending on what the offline editor did with it.
- Speed Ramps require careful examination to ensure their accuracy against the offline.
Any errors or notes to do with the conform (apart from inaccurate speed ramps) are always flagged up at the end of the conform in a saveable file.
Media Composer Lockup on Exit
This is really an issue with the Wacom Driver. Here is the problem:
When we exit Media Composer, it appears to close "most of the way" then the screen "gray's out" and then it just stops. If we click the Close "X" icon an error box appears saying that MC has stopped working. Click OK and it goes away. No harm being done to the projects, but it is not real pretty!
This is an issue with the Wacom virtual HD Driver. Just disable it in device manager and it cures the lock up on exit issue.
(thanks to Ed Fraticelli and Pat Horridge)
MEDIA MANAGER
The media manager allows for direct .GEN and .WAV file manipulation.
Options menu allows for different sorting options.
When entering, hit REFRESH to show media. OPTIONS sets search priorities, sort order of results. NOTE: Based on the default filter, Media Manager (Media Tool in v6.x) scans only for media in the opened project. This utility is slow on system using massive storage space, as it needs to rescan the entire media folder every time you access it. Not a good idea to use on Unity for example...
R-click-defragment.
R-Click- pick thumbnail frame
R-click-find clip—shows all clips that use that piece of media
Defragmenting a specific clip: Select a clip or sequence in your DS Explorer) and hit "Show Media"...This will display the media files in the Media Manager. Select the media file (.GEN file)to be defragmented, right click and select "Defragment".
MEDIA LOG
When receiving a sequence from Media Composer, ask for the sequence to be
decomposed with however many frames of handles you desire. Once in Media Log,
select all the clips that contain audio, right click and modify them to have all 4 tracks of
audio. The select the sequence, Right Click and export as AFE. This will enable you to
digitize all audio tracks into DS. This is important if the offline was done from a 4
channel master dubbed to tape sources that have only 2 audio channels.
If lots of subclips were used in offline, those clips will not be able to be modified in
Media Log. Make sure that “Statistics” is displayed in the Media Log bin, then select all
of these clips and export them as ALE. When importing into DS, go into Media I/O, then
call up the ALE import window, open the ALE file and select the 4 channels in the Audio
Channels matrix, then create the logs. This will cause the subclips to have all 4 channels
of audio.
MEDIA BACKUP
Media may be backed up to any drive. It must retain exactly the same
path when replaced. You must also wait until the media indexer has
finished re-indexing the media before it will be recognized. Large
amounts of media may take a long time to index, so wait until
UMMDS.exe has finished before expecting to see it.
MEDIA PURGING
PURGING MEDIA MANUALLY
Go first into Data Management > Project Manager, identify the project name versus its GUID folder (that is the {01BF7A3E-2EA2-4D61-AEC6-EFDE18E3727C} type of alpha-numerical name you see), then access the video storage folder and the very same GUID folder.
From that location, you can manually delete all ds$.gen and all VidCache.gen files. It is also OK to delete the entire folder, as DS will recreate it if material is being recaptured for the project. Deleting in Windows Explorer is faster because it does not check for other projects and sequences dependencies, but you will lose media in other such projects and sequences if you use this method. Avid DS Support won't discourage this method because it does not break anything in the software but you can only blame yourself if you lose your critical media by not using the Avid DS tools.
Note that you can do the same in the audio storage\"GUID" to delete audio fast.
Please note: Project Manager requires Microsoft .NET Framework 2.0, 32 or 64-bit depending what OS you are running.
MONITOR SETUP
(added 08.09.2007 by demand MH)NB: This is for NTSC monitors using SMPTE color Bars, also known as "split color bars"
Look at full SMPTE color bars, all three "guns," R, G and B.
- Adjust brightness and contrast so that the darkest black bar of the "pluge" is invisible but the other two black bars are black and lighter black.
- Switch to Blue "gun" only.
- Adjust chroma (color intensity) until outer bars match the lower chips and they look as close to one continuous bar as possible.
- Adjust color phase (hue) until inner bars match the lower chips and they look as close to one continuous bar as possible.
- Look at all three "guns"
You're set up.
There may be a difference between "underscan" and "overscan" On a decent broadcast monitor, this should not be the case.
For more information and a more complete setup, please see Video University.
Morphing Text
How to morph one letter or character into another.- Type a letter, make it 1 frame long
- Type another letter later in the Graphics session, make it 1 frame long
- Use "Text to Strokes" on both characters and delete the original text bodies
- Park over the 1st letter and select "Morph Start" (in DS v10.2.1 It's on GFX2 presets which is actually labelled GFX3!)
- Park over the 2nd letter and select "Morph End"
- DS will create a new morphed stroke and delete the originals
(Thanks to Tony Jover, Don Brown and John Heiser)
MISSING MEDIA
(Added 11.07.2007 MH)If you are working on a project and you have shut down your system only to return the next day with media on your timeline that you know is there missing, it is usually due to the Media Indexer not finishing its work.
Here's how to prevent "Missing Media" from happening again.
- Start your system
- Press the Three-Fingered Salute to all that is bad in Windows. (that's [CTRL]-[ALT]-[DEL]).
- From the selection, which may appear in the middle, spanning monitors, pick "Task Manager."
- Click on the "Processes" Tab
- Watch UMMDS.EXE and wait until it gets down to 0 CPU usage and stays there.
- Turn on your BoB (if it is not on).
- Start the DS application.
If this does not work, you may have an Indexer Problem due to the system not shutting down correctly. If this is the case, please follow the steps for solving Indexer Problems
MULTICAM EDITING
Turn on DISPLAY UNUSED MEDIA, R-click in timeline.
Use markers at sync points to visually sync up tracks that don’t share the same timecode.
Use SOLO to display desired track
Select an area in the clip that you would like to make active. Hit CUT TO (C) button to make that clip active. Only works at the end of the edit. To work in the middle of a track, use A to Activate a selection.
CTL-Tab….Move down the timeline a track
CTL-SHIFT-Tab… Move up the timeline a track
Note: you must conform audio to your cut selections using the cut to command with your tracks selected while parked on the cut points.
MULTI-CAMERA CUTTING IN “REAL TIME” (METHOD 1)
- Use "Display unused material" by r-clicking on the grey stripe below the timecode numbers on the timeline.
- Put your clips on background tracks above each other.
- Select the clip you want to cut to using "ctrl+tab",
- Push "c" on the keyboard to perform the cut.
- Use "solo" to watch the deactivated clip.
MULTI-CAMERA CUTTING IN “REAL TIME” (METHOD 2)
- Place cam A on background track.
- Place cam B on Video track.
- Add a wipe as a clip effect to the clip on the video track - with no animation - just to be able to see both cams.
- Set focus on the timeline.
- Hit play.
- Hit [M] key - create marker- whenever you "feel" each cut- on the fly.
MULTI-CAMERA CUTTING IN “REAL TIME” (METHOD 3)
- Right click on the top of the timeline and select - display unused material.
- Cam A on video track 1.
- Cam B on video track 2.
- Solo a track, drag over the timeline, select the clip and hit [C] - for cut - it changes the activeness from track 1 to track 2.
MXF Media
The DS Media Indexer takes a little longer to index .MXF files over native GEN and WAV but on local SCSI storage the difference is minimal. It is a bit more obvious on Unity, though, but if you are using a separate Media Indexer to do the indexing then it doesn't really matter much.
DS Version 10 doesn't Export MXF
DS Version 10(Case Study)
I want to output an MXF file for our audio guy to accompany an OMF export, but v10 doesn't have this file format. I couldn't find this in the output settings. Version 8.4 had it. This is a real PITA!
Avid removed "Output MXF" because there were too many scenarios were DS was generating MXF that Media composer would not understand. To achieve what you want, you just need to create an MXF storage that is writable and has no purge option set. You can then output your timeline to Media Composer and you will create an MXF file that either Media Composer or ProTools can understand.
(Thanks to Nathan Downing, Chris Hahn, Bob Maple and Jean-Marc Porchet)
Revised: Nov 11, 2013 10:14 pm