A
Contents
How to import from an AFE file on DSNotes on the AJA I/O card
Anamorphic Conversion
How to use the Animation Editor
Antivirus applications
Antlers and Schlitz!
Arri Alexa
Working with Audio
- Scrubbing Audio
- Wrong source audio selected on the deck template (Embedded vx AES/EBU) and how to recapture
- Embedded Audio captures on the wrong tracks
- Unsupported sample rate
Auto Saves and recovering your sequence from an Auto Save File (The DS Attic)
Archiving
- Archive to multiple tapes, something the DS "doesn't do."
- Archive to external drives using DS Archive Backup.
- Archive failure due to sourcemodel names too long
- Archive Tape Log timecode change
Avid VideoRAID SR
How to import from an AFE file, using .MXF media
When you are importing projects from Media Composer or Symphony, you have to export them to DS first in those applications, which will create an AFE file. AFE stands for Avid File Exchange and it is a means by which you can use bins created in the other two editing applications with DS.
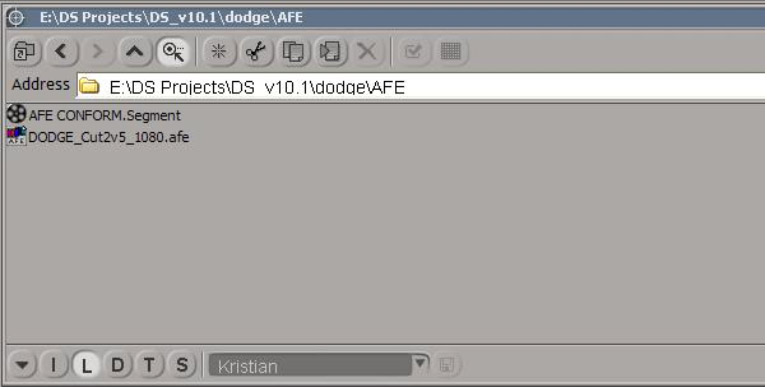
First, double-click on the AFE
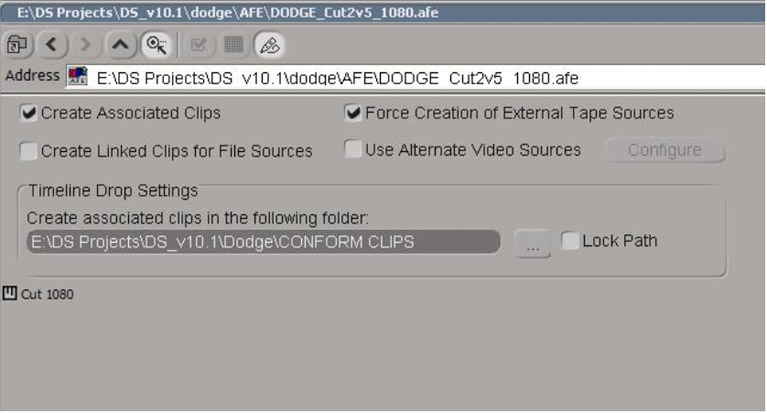
Next, create a new folder in your project called ‘Conform Clips’, and select the path in the Timeline Drop Settings. (click on the button with three periods)
Tick ‘Create Associated Clips’ and ‘Force Creation of External Tape Sources’.
Then double-click the icon below, in this case ‘Cut 1080’.
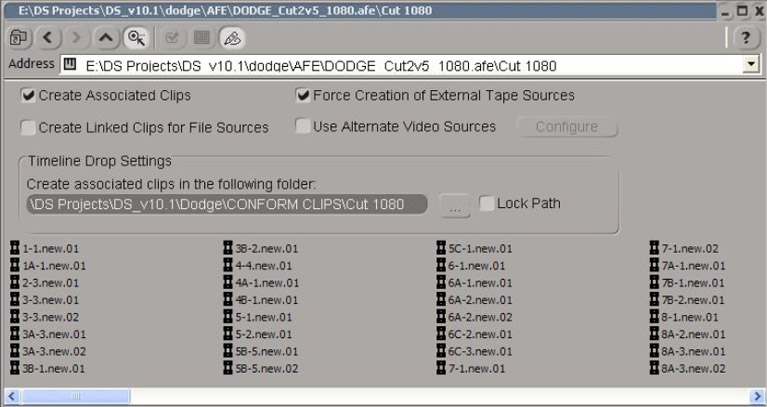
All the clips associated are laid out as you can see, so…
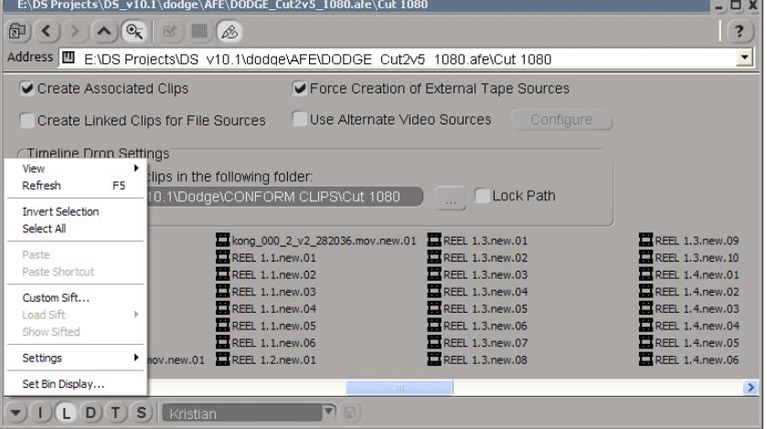
Click the down pointing arrow (bottom left corner) to access ‘Set Bin Display’. Select it and it will give you the menu below…
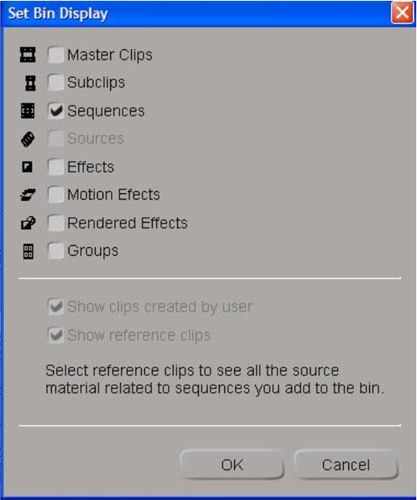
Click Sequences and click OK.
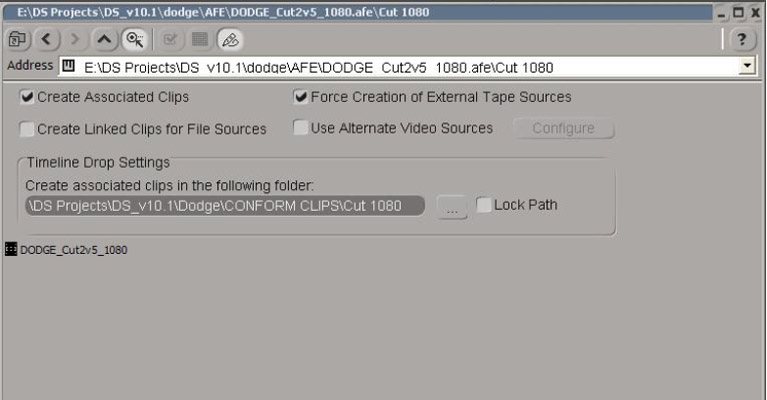
Now your Sequence is ready to be double-clicked. Do that and ...
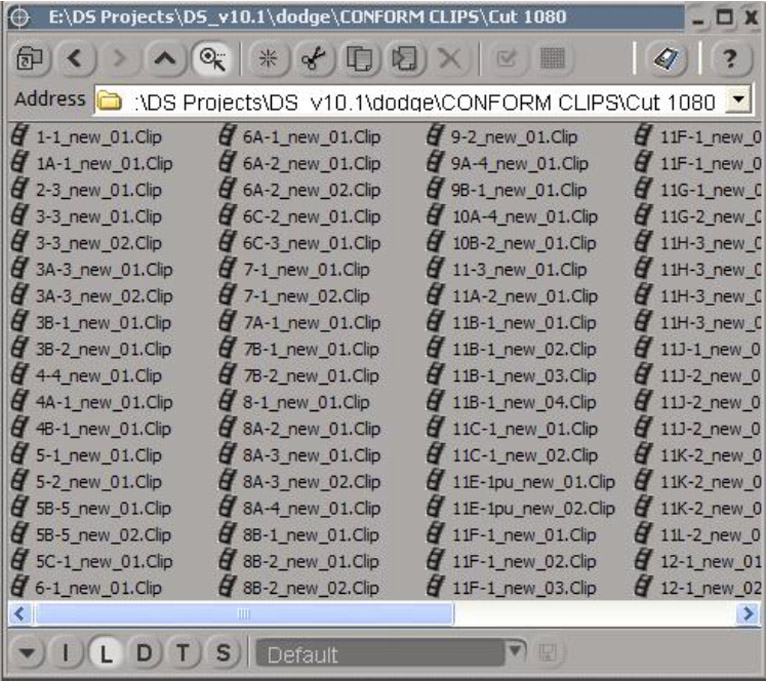
In the folder you created called ‘clips’ or ‘conform clips’, will be all the clips associated with the project/sequence. They should be red, which means they have no media.
Providing your Capture Tool has the correct deck templates installed, you can now right-click these red clips and select ‘Recapture’.
If you created MXF media in Media Composer or Symphony, the clips should not be red if they are on your Media Array and you have set it up for MXF media and those files are in that folder set up for that on your DS. You don't have to capture, you are ready to edit.
Notes on the AJA I/O Card
With DS Version 10, more people are using the AJA I/O card as it is offered as the solution (the Nitris does not work) with the HP xw8600. Please note, you have to have a dual-link license in order to work with an Avid DS and 4:4:4 media. Dual-Link requires the AJA - it always has done, nothing has changed there.Without the AJA (which must be purchased through Avid if you want to do 4k) you won't have the license. Without the license you won't have the 4k sequence presets.
With DS 10.1.1, you can work with RED Cine. If you have a Dual-Link system and it is upgraded to 10.1.1+, you can work with RED Cine:
- New-->Sequence-->Film -->RED
- Under "Resolution" you have the choice of Full or RT Proxy (if you have an Nvidia 3700 on the 8600).
If you don't have the 8600, there is an official Avid "Jover:"
- Create your masterclips as Log files in a Final 4K sequence, Capture settings media conversion set to Scale Keep aspect ratio. RED settings set to Full Premium.....Do Not Capture Yet
- Open a new HD offline sequence.
- Recapture from timeline, and if you want, you can said "yes" to change Format Capture settings and switch to Half Good or even Eight Good if you want to capture faster and don't care about perfect image (it's offlining anyway) RED format specifics tab will not change if you reenter to the options (always show options choosen when creating log, this is something Avid is going to address, but it's captured half good or eight anyway, capture speed is proof of it).
- Edit the sequence.
- Reopen the Final 4K sequence and choose in sequence pref to "show media not availaible" instead of "closest available" and "Scale Keep aspect ratio" for Presets and media conversion.
- Drop the HD sequence in it: Sequence should appear offline.
- Select recapture from timeline and change your Format Capture to full premium ...
- Wait a long time until all media from the sequence has been recaptured.
- Color Grade.
- Output.
Because of limitations with the RED SDK - Audio is NOT part of this
workflow at this time.
Sync issues
Jean-Marc Porchet said:When you get to the output tool the initial mode is a a capture passthru mode so the incoming video is passed through the AJA and DS and yes at this point the AJA is locking to the incoming video. However as soon as you trigger an output DS switch back into play mode and the AJA then locks to the external video.
This is also how it worked with Nitris.
Dropped frames are not normal and having a valid external sync or not should not have an influence on dropping frames. We know we had some issue with audio and or video frames and samples dropped prior to 10.1 but it would be new to us this still happens in both 10.1 or 10.1.1.
Igor Ridanovic said:
When you're outputting and the VTR goes in record so the green sync light on the DS taskbar lower right goes amber. If you disconnect external reference and feed valid video SDI signal the light remains green. I suspected this to be related to the AJA driver.
Anamorphic 16:9 to 4:3 conversion
(added 07.10.2007 MH)- Create a new 4:3 project.
- Change settings to fit either x axis for letter boxed or y axis for center crop in sequence preferences.
- Drag the anamorphic footage into the 4x3 sequence.
N.B.: Digibeta footage shot 16:9 is anamorphic.
Or just stick a DVE on the 16:9 timeline with X=133.33 (or Y=75), which should play out in real time.
ANIMATION EDITOR
R-click the animation button on any property page to get to the animation editor for only the properties of that page.
Tip: To cheat the value of a slider past its limit, set a Key Frame using Auto Key (sets
a Key Frame for that value only) and step into the Animation Editor. Then enter a
numeric value that exceeds the slider limit.
Animation curves can be saved and loaded in two file types: .FXI and .FRAW. FXI is
compatible with XSI and DS.
Curves may be saved or loaded. Cut, copy and pasted.
Tip: To export or load an individual animation curve, select the curve and click on the Save icon. To replace a curve with a previously saved curve, select the target curve and click on the Load icon, navigate to the desired curve and click load.
TIP: To adjust the speed in which a scale stops or accelerates in multiple dimensions (XYZ), Edit one, and then just select the entire curve and copy/paste it to the other channel (that's usually what Sexy Bob does), or edit one and hook the other up to it as an expression.
You can select both keys to move them around in time or value but you can't adjust the tangents at the same time.
To view a curve, it’s effect must be selected in the effects tree.
Crop Curves will trim rather than scale animation curves in scaled time. Time values of
keyframes will not change.
Control and dragging a box will select Key Frames within area.
Frame and value windows may be incremented or decremented with + - numerical
values.
Orange DIVOT at upper left—keeps the area you are working on in the graph as you pan
or zoom the graph.—ALSO allows for selection of multiple effects in animation editor
window.
VIEW META-REGION. has tabs at the bottom of the graph, which allow you to move
all time-aligned keyframes at once.
TOOLS SELECT—selects points, groups of points. Marquee select or shift-click or ctl-click to
select multiple points.
SELECT REGION- drag over a group of points. Makes a whole section of keyframes
which can then be moved, stretched, shrunk, copied, pasted, etc. R-ripple button at top
ripples or doesn’t when cutting and pasting.
MOUSE KEYFRAME CONTROLS
- Left button- MOVES a keyframe
- Middle button (press wheel) ADDS a keyframe
- Right button—REMOVES a keyframe
ZOOM Select- Z
F frames selection to full area
SHIFT-F Frames all curves
- X-drag—pan
VIEW—NORMALIZE Y VALUE—makes all curves visually the same height.
Numbers are arbitrary. Helps isolate effect parameters that have keyframes. Great for
working with multiple parameters together. NOT ACCURATE FOR VALUES.
View tip: Set the Animation Editor to only show Animated Parameters –will reduce
clutter in animation editor window.
View tip: Turn on labels for curves and axis in the View menu.
FRAME SELECTED KEYS—makes selected keys fill the graph window.
SNAPSHOT—holds a snapshot of each curve… toggle between snapshot and new
adjustment. In View preference, you can turn on snapshot curve…holds a ghosted
version of the snapshot in the graph.
- Snapshot and Swap to Snapshot
- Snapshot takes a snapshot of a curve and hold it in memory
- Swap to snapshot toggles an edited curve with the one in memory
H.U.B.
To handle splines- H—HANDLE selection—for grabbing a handle when it’s too close to a spline
- U—UNIFY tangents-- Unite broken splines… make angular splines curvy.
- B—BREAK tangent—makes curvy splines angular—broken spline.
CURVE PROCESSING
- RESAMPLE will give you more or less points… More points help smoothing work better.
- FIT—Removes extra keyframes, thins them out.
- Smoothing Key Frames adds points on a curve by resampling.
Key Frame Types: Lock in time, specific value, Slope Vertical, Slope Horizontal.
Plateau Slope: Eases the in and out of a curve but makes a linear curve between two Key
Frames.
Curve Types:
- Constant Extrapolation
- Gradient extrapolation
- Cycle (loops the curve between first and last Key Frame)
- Freeze Cycle
- Make Rotation Continuous (Inverts the direction of a circular value, such as hue.)
Crop Curves—turn on to stretch the duration of an effect, without stretching the
keyframes.
Smoothing Curves
- Select the curve to be smoothed
- Resample the curve with a step of 0.5, with the "Keep existing keys" button checked (this will give you the maximum number of points to smooth, one per field)
- Remove any keys at the beginning or end of the curve which are flat (i.e. where there was no motion)
- Select Average or Gaussian smoothing (I usually use Gaussian - the further away a key is, the less influence it will have)
- Select the Range. This is the number of keys either side of any key that will effect the key in question. In other words, a range of 5 will mean that a key's value will be influenced by the five keys on either side of it.
- Select the variance (if using Gaussian). This will determine how much the smoothing will smooth your curve - the higher the number, the flatter the curve. Start with say 2.
- Hit the "Smooth" button.
Antivirus Applications that work with DS
From Avid:
There is no AntiVirus listed on the Support Center because there is none officially approved by Avid. (even though the KB states: Symantec Antivirus version 10.1.5.5000 is the ONLY version currently qualified)
But I can say that we faced many problems with McAfee, and so this one is the least recommended...
We are currently using Symantec Endpoint Protection with no ill-effect.
What others say:
What we do here we simply connect the client's drive to another computer loaded with antispyware and virus protection, an access it through the network.
We were using Symantec Corporate Edition, as we owned it, and it was recommended by Avid. Last year, when the autorun virri were all the rage, we found Symantec to be quite useless. We switched to ESET NOD32, and is worked well. Initial scans often found dozens of infections that Symantec had ignored. We leave it running live in the background. This protects us with customer drives.
Once a drive is attached, NOD32 will immediately warn you. A scan is not required typically.
We have Avaast on our DSs and it works fine. We do turn off on access scanning though as it potentially could slow down the video drives. We've also disabled USB drives on all our edit systems since a client managed to infect all our PCs with a virus brought in on a USB drive. All drives are now scanned on an non network attached PC before being allowed onto the network. Its a real PITA but not as much as having to spend a Sunday virus checking all our PCs and cleaning up a virus that they'd all put on Edit Share.
(Thanks to Jef Huey, Sylvain Labrosse, Randal L Rike, Curtis Nichols and Serge Verrault)
Antlers and Schlitz! The real story
A new user joined the DS list sometime in -- I'm gonna guess mid-2001 (Tony guesses around 2000). He was from the mid-atlantic area. Henninger Media Services -- Richmond and Charlottesville, Virginia branches -- were hotbeds of early DS adoption.
Lucas Wilson, in his welcome to the list, had a fit of imagination. He wrote:
Welcome, Jeff.... I assume by now that Tony Jover has explained the initiation process. If not, just don't be alarmed when several people with "Henninger" tattoed on their foreheads show up at your door wearing moose antlers and carrying cases of Schlitz. Lucas Wilson
Soon thereafter, Schlitz and antlers became mentioned every time someone joined the list.... and passed into myth and legend.
(Thanks to Woody Sherman who got it right, Tony Jover and David Friedman -- good attempt)
AUDIO
RENAME TRACKS—R-click track properties, or label the mixer faders.
On Mixer page, set up MIXER CONFIGURATION, i.e. stereo, mono, 5.1, etc. DO
THIS FIRST.
Post button on faders switch input channel VU’s to post fader. Normally, meters are prefader.
Double Click a fader or pan control to set to default—0 dB or center pan.
R-click pan to enable or disable.
Note: Pan is available on Stereo as well as Mono channels/tracks.
Note: You must enable pan control. R-click on pan to enable pan controls.
Effects can be stacked in input channel viewer. R-click to add mixer effects.
ALT click on Track View: Shows channels routing.
R-click in effects box to add a channel audio effect (post clip effects, post track effects).
ORDER OF PROCESSING:
- Clip effects (stays with clip when moving it)
- Track Effects (affects entire track)
- Mixer/fader effects (affects entire track)
VIDEO/AUDIO SYNC--After making an audio container, hit S (Sync Lock) to maintain container’s sync with video. CTL-Click video and audio clips before re-syncing.
FADER AUTOMATION—hit ANI button. Start play (L), move fader. If you want to correct an animation halfway into a clip, start play from end of good area and continue animation. Starting from beginning blows away previously recorded automation data. To automate PAN without touching FADER automation, r-click to BYPASS fader automation (and vice-versa). Mixer Animations are relative to the parent sequence timeline, NOT per clip.
The Keyframe Icon both red and green indicates that one animation exists.
USING ANIMATION EDITOR for LEVEL TRACKING
Make a new layout for audio… Open a floating animation editor window, and move it over the timeline. Scale animation editor window, and timeline to match.
Switching mixer configuration (mono/stereo/5.1) will NOT remember animation.
Note: Control-click S will sync lock any clip or set of clips in the timeline.
Apply REVERB to track effects instead of clip effects, in order to have reverb time spill past the end of the clip. Or, lengthen the audio container with reverb to accomplish the same thing.
Minimizing pre-recorded reverb: Export it to Quicktime and add compression to suit. Will reduce ambience and undesirable reverb.
IMPORTING AUDIO CD’S-
Use CDEX, which is on DS installation CD. Also, dBPowerAmp. OR use CD Copy or Audio Catalyst… all will make a .wav file.
SEPARATING AUDIO CHANNELS
Use Dual Audio Channel Switcher in the audio effects to separate the left & right channels (needs to be installed separately from your Drivers CD). OR you can make MONO A1and A2 tracks in your timeline and place the same clip on each track and they will separate out respectively.
Creating two different mixes on the same timeline
(Added 07.08.2007MH Thanks to Sean Stall)
For a separate mix, copy your sequence later on the timeline, create a 4 stream audio track and place all of your audio clips in an audio container (which will reside on the 4 Stream track.) Set the mixer inside the container to 4 Stream and track patch your audio accordingly. Now you have your main mix on the first part of your sequence on their respective channels, and your split tracks in an audio container with the right configuration later on your sequence. Output all at once without having to make new sequences or change configurations.
Dealing with phase inversion
(Added 11.20.2007 MH)
Duplicate the phase-inverted track. Put the DUAL AUDIO CHANNEL SWITCHER on both tracks. Isolate Left on one. Isolate Right on the other. Patch them accordingly in the mixer and add a GAIN effect to the left track. Choose the "invert phase" button on the Gain effect. MAGIC.
DS does not handle more than 8-channels for output
As VCRs get more audio channels, DS has lagged a bit and will not do a 12-channel output. But there is a workaround for outputting 12 channels of audio if you have a DS-Symphony dual-boot system:
VST Plug-ins (DT - 12/18/06)
**The free MDA VST plug-ins give you a few more options for tweaking your audio http://mda.smartelectronix.com).Scrubbing Audio (Keyboard Shortcut)
To scrub audio, hold down [Ctrl]-[Shift]-S
(Thanks to John Heiser)
How to recapture audio that was not captured using the right deck settings
(Case Study)
One of our editors was capturing from Mini-DV tape and instead of selecting Embedded Audio, she used AES/EBU. Now there is no audio on any of her clips. We've been trying to recapture the clips with Embedded but they still come back with AES/EBU and no audio. Is there a way to change this without having to start from scratch with the capture?
The clips don't remember what physical source they came from (AES or SIF) - That's part of the deck preset you're capturing from. When you are capturing new material you can switch it from the default, but when you recapture, it's going to use whatever defaults the Deck Preset has.
- Select all your clips, right click, and Purge just the audio (I like to use 'Show Media' and then sort and select the WAVs and delete them, but you can use the Purge tool and select appropriately.)
- Under Deck Configuration, make sure the deck you're capturing from is set to Embedded
- Save the deck preset so it sticks.
- Select the clips and recapture.
If you have your room wired for Embedded audio, delete all deck templates that use AES/EBU. If you have your room wired for AES/EBU, delete all deck templates that use Embedded. If you have a mixture, save deck templates that are specific to the type of capture you do from each VCR.
Many facilities will set up a microphone input to a voiceover booth for capture with DS. Some will set up a microphone in the edit room for scratch narration. Each of these should be set up as a "deck" preset for live capture so that the appropriate audio type is captured. This will save considerable time.
Also, when recording audio from a live source, remember to change the tape name for each recording. If DS receives no timecode, it will record over each previous recording with the new recording with a timecode start of 00:00:00:00. Being disciplined about recording from live sources will prevent headaches in the future.
(Thanks to Margaret Faulkner and Bob Maple)
Embedded Audio Captures on the Wrong Tracks
(Case Study)
DS Version 10.1.x, xw8400 AJA and Nitris hardware.
Throw a tape in the DVCPro HD deck, go into Capture Mode and start playing the tape. BTW, audio is set to Embedded within DS. Video is fine. Audio on the tape is Ch. 1&2, audio in the capture tool says Ch. 3&4. Hmm. Ok, scrap deck config., create a new one, same deal. Restart DS, same thing. Feed output of deck directly to Leader 5700A scope and check the audio. Ch 1&2 as expected. Restart workstation, power cycle Nitris, open new project, go to Capture mode, audio is now coming in on Ch. 2&3!!!
Response from Avid: This occurs due to a problem with the firmware. Manually reloading the Nitris Firmware should resolve this issue.
To reload your Nitris Firmware, please see Avid's instructions
Your audio hardware does not support the seq sample rate of 44k
You're trying to open a sequence with 44k audio as the Seq setting and you keep getting this error. The only sequence sample rate that you can choose is 48k audio. The audio won't play.The sample rate is restricted to 48 when your input is set to be embedded (that is the only valid rate in that scenario). If you change your input to something else that should work and will not affect your output because the audio is broadcast to all on playback.
ProTools and the Broadcast Wave Format
(Case study thanks to Knut A. Helgeland)The symptoms:
Imported audio files sound fine in the source window (and in any external editor), but samples are chopped off once the file in placed in the timeline.
This thing really had me going there for a while. We've been doing audio laybacks on the DS since forever, and it's always been sample accurate. Now it just seemed after the DS 10.x upgrade, not so. And it was a weird issue; The file plays fine inside DS, just not in a timeline! We tried dragging it into an audio container and had the same issue.
The solution:
My audio engineer and I started analyzing the issue. It so turns out that on this specific project, which is music based (the broadcast design package for our local Grammy's), the 95 BPM ProTools project was started before they had an animatic of the design, and once they got that, the frame rate of video didn't fully align with the bars of the project. It's like half a frame off. But audio is audio, so he bounced his bars, in .WAV format as we always do, which incidentally defaults to Broadcast Wave Format (.BWF), which has embedded timecode.
In DS, the file reads correctly in the source viewer, but when you put it in the timeline it aligns to the embedded timecode, chopping off the "extra" samples before a full frame count. Bouncing the mix again in .AIFF format solved the issue and was sample accurate. Exporting the original file as .AIF from QuickTime Pro did the same thing.
So it's not a bug, it's a gotcha. If you receive a final mix as .WAV or .BWF, and the start is wrong once placed in the timeline, convert the file to .AIF or .AIFF to remove the embedded Timecode.
Auto Saves
Also known as Attic (a feature request) (MH - 05/18/2007)Directly from Avid: Recovering a sequence after an application failure
Based on the interval set in your User Preferences, Avid DS will save a copy of your sequence as an AutoSave file. This AutoSave is saved to a maximum of 4 copies. In the event of an application crash, these AutoSaves are used by the recovery mechanism to reopen the sequence.
As always, it is recommended that you save your work often. Ideally, you should be able to rely on copies of your sequence (created via "File > Save As…") or an archive of your project .
The AutoSave files only exist to recover a sequence from a crash and the manual recovery of sequences should not be considered a replacement for frequent saves and archives of your project, and should be used as a last resort.
Note: The AutoSave files are purged on the next successful launch of Avid DS. This means that a new set of AutoSave files are created and previous AutoSaves are no longer available, unlike the Media Composer Attic folder option.
To manually recover a sequence from an AutoSave file:
- Locate the most recent AutoSave files from the CrashBackup folder on your C: drive. These can be found at C:\Program Files\Avid\DS_vX.X\DSSystem\temp.[USERNAME].
(Text appearing in bold will vary based on your version of software and the user account name) - Drag a copy of the most recent AutoSaves to the project's folder location.
(the root of the project is probably the best location for this operation) - For each AutoSave you intend to check, right-click the AutoSave file and choose rename. When renaming the file, add the extension ".Segment" to the end of the file name.
(This is case-sensitive. Note that the "S" in Segment is capitalized) - When you launch Avid DS and choose that project, you will see a new sequence called AutoSave. Open this sequence and verify its content. If this sequence is usable, choose "File > Save As", save a copy of this sequence and next exit the application to clean the memory from the potentially dirty content.
- Restart Avid DS and you can now safely open the newly saved sequence (from the recovered AutoSave copy) and resume work.
If there was no AutoSave file present in the temp.[USERNAME] folder, verify the CrashBackup folder content. You may found additional AutoSave files in there. If present, check their data and time stamps. If the match the date and time of the crash, you can also use these AutoSave files and attempt to manually recover the sequence.
C:\Program Files\Avid\DS_vX.X\DSSystem\temp.[USERNAME] maximum number of possible AutoSave files: 4
- AutoSave1 < latest autosave recovery file - also created if you press Ctrl+S
- AutoSave2 < autosave1 renamed autosave2
- AutoSave3 < autosave2 renamed autosave3
- AutoSave4 < autosave3 renamed autosave4 - when a new autosave1 is created, autosave4 is then deleted
When Avid DS is restarted, it automatically reads the most recent AutoSave file and loads the data. If the content is deemed too corrupted, it automatically reads the next available AutoSave until it picks the least damaged file content. The sequence then appears as "Untitled" and Avid DS presents the user with a message requesting this recovered sequence to be save to a new name, and to restart the application. The user MUST not ignore this message.
C:\Program Files\Avid\DS_vX.X\DSSystem\temp.[USERNAME]\CrashBackup maximum number of possible AutoSave files: 3
- AutoSave5 < present only if autosave2 existed *
- AutoSave6 < present only if autosave2 and autosave3 existed *
- AutoSave7 < present only if autosave2, autosave3 and autosave4 existed *
- The reason being that AutoSave1 is usually lost in the crash, thus AutoSave2, 3 and 4 are automatically pushed in the CrashBackup folder and are renamed AutoSave 5, 6 and 7.
ARCHIVE
For complete instructions on how to archive projects, please see: How to archive projects
Archive Backup Utility
Officially, the Archive Backup Utility is a nearline temporary archive system for media files and project data. Since DS media file formats from time to time undergo subtle under-the-hood improvements alongside DS version updates, possibly making media files incompatible between versions, using the ABU for long-term archiving is not recommended or supported by Avid. The approved archive method is to video tape, which is a bit more agnostic over time. In theory.
What I've read is that most people are preserving their original source-native files on hard drives, and in multiple copies for safety. In terms of the overall budget for most projects, another several hundred dollars for some hard drives doesn't add that much. Best practices for care and storage of the drives, and protocol for updating/recopying over time, are a moving target.
(Thanks to John Heiser)
NB:
- The DS Archive Backup Utility is an additional tool, which is not part of the core product, so is unsupported.
- If you use this tool as the core of your File Archive workflow, there is no guarantee the archives can be restored on Avid DS versions in the future and there is a guarantee that no caches will be restored.
- Currently the only, Avid, futureproof Archive and Restore solution is via Tape.
- This type of archive tool is on our Feature Requests. DS Support created this tool as a half-way-house method of achieving that request until it gets implemented into the main toolset. It remains unsupported.
What about archiving stuff that you linked to from another project?
DS Archive Backup takes its linked files list from the archive DS is making. These are only files that got linked (not imported) in the Capture process. So in this respect, all linked files will be included in the backup process.
But Clips that were imported in the project but remained linked in the source project will not be included in the DSAB list because they do not belong to the project to backup.
Archive to Tape is indeed better because DS knows of these external (to the current project) media files and they are included in the Tape archive.
The DS Archive Backup is a Support own-made utility and not using any of the DS code and resources, hence its limitations.
(Thanks to Sylvain Labrosse)
Archive only the material you need
(added 11.26.2007 MH)
There is no one-button-push way to do this unfortunately. DS wants to archive all the media that exists online for the entire project.
The only way to do it is to make it so only the media you are interested in archiving is the only media on the system - which generally means
purging all of the other material off the system.
You can jump through a bunch of hoops to do it without losing all of the 'other' media, but it's kind of a pain and requires extra disc space…
Make a second video storage in another directory outside of the regular 'VideoStorage' one, and use the Media Tool to copy the media used in a particular sequence(s) to the new storage. Then you remove the main storage from the indexer, and do a purge 'Except For' on the sequence in question to dump all the extra heads/tails. Finally, archive the project. Then you can deactivate and/or delete the temp storage, and re-activate your main storage so things appear as they did (with all the original material online).
Obviously not a quick or terribly straightforward thing to do but it works
ARCHIVING WHEN MULTIPLE TAPES ARE REQUIRED
DS does not archive to multiple tapes. Here’s a workaround:
Close DS. Go inside your videostorage folder for that project and move half of your files out to a folder called something else, temp video for example. You must put it outside of your shared videostorage folder. Open DS and archive, it should only be seeing what is left in your folder. Once the archive is finished, swap the video files and archive again. When you restore, restore both archives with media.
For more on archiving please see Using the Data Manager to make an archive
Archiving to an external drive
Softimage has created the DS Archive Backup that will do the work for you. In order to use this tool, you must have installed the Microsoft .NET framework (there are complete installation instructions on Microsoft's website as well as a download link) for the DS Archive Backup to work.This will archive all footage and linked material associated with your project that was not imported via link from another project on DS, ie:
- Link to images outside of DS = will archive.
- Link to footage from other DS project = will not archive.
It would appear that e-SATA drives and drive arrays can be very useful for this process. Rock Creative Images in Nashville, TN uses them for this purpose.
Archive Failure due to your sourcemodel being too long
If you are archiving your project and you get an "Archive operation failed" error, it could be caused by one or more of the sourcemodel names being too long. There is a fix for this on Avid's website.
Archive Tapelog Timecode Change
(Case Study)Pulling in an old archive. Noticing the video being pulled back in from tape is going to a wrong timecode on the archived D5 tape. I know its the correct tape, because the archived footage belongs earlier on the tape. Is there a way to go into the archivetape.log and change the starting timecode so the restore can capture the right archived material? Why should a "correctly archived archive" change timecodes?
- Always make sure that you have the correct archive tape (if you did several for the project).
- Always confirm that the first frame on tape corresponds to the timecode listed in the archivetapelog whenever you do an important archive (is there any other type?).
- The archivetapelog can always be edited if required; it's only a text file.
When You Archive, Be Sure First
When you make an archive DS automatically fills in the start timecode with whatever TC the deck is sitting at at the time. You can (obviously) type in a new timecode... but sometimes when performing the archive DS will ignore what you typed and set the IN to the original timecode/where the tape is currently parked.
This would happen to me often on 7.6. I haven't noticed in later versions as much ...
Anyways, what I always do before an archive is go into capture, scrub around the tape to find where I want to start it (I usually build 'comp archives' with many different jobs on them) and then park the deck exactly there just to be sure, close capture, and do the archive.
(Thanks to Pete O'Neill, Tony Jover, Craig Gordon and "Sexy" Bob Maple)
Minimal requirements for a generic Avid DS Assist Station platform:
(added 04.16.2008 thanks to Tim Bolt)Dual Processor
- Dual or Quad-Core Intel® Xeon®
- Dual-Core AMD Opteron (AMD single-core not supported)
- 2GB for SD (Windows XP 32-bit)
- 4GB for HD (Windows XP 64-bit recommended)
- 8GB or more for HD RGB and 2K/4K (Windows XP 64-bit only)
- ATI FireGL X1 or X2
- NVIDIA Quadro FX 3400, 3450 or 3500 (for HP xw8200, 8400 and 9300 only)
- NVIDIA Quadro FX 1500, 4500 or 5500 (for any generic workstations)
- HP LP3065 <../../download/quickfix/newhpmonitor.htm> supporting 2560 by 1600 in a single large display
- SVGA supporting 1280 by 1024 display resolution (dual monitor suggested)
- Gigabit Ethernet adapter
- Windows XP Professional (32-bit and adequate for SD and HD work)
- Windows XP Professional x64 Edition (recommended for HD RGB and 2K/4K)
Optional component that can be added to the Assist Station:
Video card (supported on Windows XP Professional x64 Edition only)
This option requires a license update to enable the Dual-Link hardware.
Install the driver for both cards by running the Avid DS Nitris DNA 64-bit drivers and firmware installer
../../download/drivers/v8.4/right_text/drivers/avid/nitris/avidnitris64.zip.
Skip the Nitris Base and Codec steps and the AJA driver will install. This is the only Avid DS qualified AJA driver. Do not install other versions to avoid issues.
Warning!
The AJA option on Avid DS Assist Station is strictly to allow external video monitoring and we do not certify the audio integrity nor its accuracy with the video material. If used for crash record to tape, we do not guarantee nor support that it will work properly.
- AJA Dual-Link Xena 2Ke
- AJA HD/SD I/O Xena LHe
Important notes regarding the new Avid VideoRAID
- Avid has not qualified the new Avid VideoRAID SR (SAS) product with Avid DS Nitris standalone nor with Avid DS Nitris and Avid Symphony Nitris systems in a dual boot configuration. The reason is that the new VideoRAID SR ( SAS) requires a BIOS version of 2.26 which is currently NOT supported for DS v8.4. While Avid Symphony Nitris v3.0 is certified with the Avid VideoRAID products as a standalone, the VideoRAID SR can NOT be used in a dual boot configuration for the reason above.
- Avid Symphony v3.0 requires that the firmware on Avid Nitris classic hardware be updated. This firmware update has not completed qualification with Avid DS v8.4, therefore customers with dual-boot Symphony/DS systems are advised not to update to Symphony v3.0 at this time.
Note:** At this writing, you cannot set up Symphony 3.0 to dual boot with any Avid DS with any array.
Revised: Dec 21, 2011 3:17 pm