K
Contents
Keyers- Luminance Keyer
- Blue Green Keyer
- How to key in DS using an alpha channel imported with video or a still
- How to create a custom wipe without losing your mind
KEYERS
LUMINANCE KEYS—2 TYPES
LINEAR LUMA—use for semi-opaque keys, such as smoke, glass, fog, fire,
pyrotechnics—stuff that is over black. Takes selected luminance values and turns them
into an alpha channel. Use brightness and offset to adjust keying alpha and foreground.
LUMA KEYER—Eradicates luminance values from Alpha Channel. Use picker to
select key area. SHIFT DRAG over an area to select a range of values. CTL-Click
additional pixels to add to key selection. Use sliders to set black and white points, with
outside tolerance controls
SOLO THE TRACK to see alpha matte.
• MATTE BLUR—does that.
• MATTE SIZE—chokes or enlarges matte.
BRIGHTNESS affects whites. OFFSET shifts the entire waveform up and down,
has most pronounced effect on blacks.
FIXING HOLES WITHIN THE MATTE—paste the clip again on a new overlay track. Copy the LUMA KEYER from the underlying track. Add a MATTE EFFECT that enlarges the matte area to fill the hole. Add another MATTE EFFECT which shrinks the matte down to the correct size. OR BUILD IN AN EFFECTS TREE---LUMA KEY to MATTE EFFECT (enlarged) to MATTE EFFECT (shrink to fit)
BLUE/GREEN KEYER
Keying based on chrominance
- Blue-Green Key Effect
- Chroma Key Effect
- HLS Key Effect (hue/lightness/saturation)
Tip: Stretch keyer property window horizontally so that all tabs can be read. Work with the Tabs from Left to Right.
Tip: Select Output Matte to preview the resulting alpha channel.
PICKING KEY VALUES
Tip: Pick a value that is of an average blue or green density.
TUNE CONTROLS
- CLEAN UP—amplifies the difference of the B&W alpha channel- works more on black than white.
- FG PRESENCE—adjusts holes in the foreground
- PRE-BLUR—Blurs RGB values pre-matte, then uses the original RGB values to cut the matte.
- RGB—cleans up noise, but will soften the matte edge.
- RED/BLUE PRESENCE—adjust for better key. A bias adjustment that offsets green from blue or blue from red.
Tip: Leave cleanup at values of 50/20/20 if these controls alone do not result in the desired matte. Offsetting these values will limit other parameters in the effect settings.
Tip: Pre-blur averages gray values in the matte and can destroy edge detail in the matte.
Tip: Select Keep Original Alpha if the clip has an alpha.
Tip: If the TUNE controls don’t work, try picking on another color.
MATTE TAB
Works like the luma keyer for alpha—narrows the key range to black and white. Use pick tool on FOREGROUND.
- Controls the Luma Key of the alpha channel.
- Keep edges softer for good edge to fill transition.
SHAPE TAB
- For creating garbage mattes.
TRACKER TAB
- Select a stroke (shape) then use the tracker to track a garbage matte.
SPILL REPLACEMENT TAB
Works on the edges of the keyed in object.
- By default Spill Replacement is active when the effect is applied. This is often undesirable and should be turned off prior to editing the effect.
TIP: Save a version of the Blue-Green Key Effect that has Spill Replacement off by default.
- Pick Hue: Applies selective Color Correction on the Key Color so it can be desaturated.
- Reduce the Luma Gain to increase contrast in the Key Color.
Click on pick hue and select the color you want to replace (green/blue spill on the hair of the talent) then start playing with the color wheel the saturation and luma gain brightness until you see that your green/blue is being replaced by this color you are mixing. Then you can go to the spill matte 1 and 2 to play with the softness of your alpha, shrink, blur it etc.
SPILL MATTE 1 TAB
Works on the keyed-in object. Turn on preblur to reduce noise.
SPILL MATTE 2 TAB
Works on the edges of the keyed in object.
KEYING TIP-KEYING BLACK LINES WITH NO ALPHA CHANNEL
Drag the layer up to the alpha thumbnail within a composite container, and make sure that you click on the top thumbnail to export the alpha up through the container. Also make sure you're using the RGB for the alpha, not the existing alpha channel (which is fully opaque.)
Another way to do it is by using the Channel Switcher, and mapping Luma to Alpha.
Keying tip for working with material that has low color resolution Please see Isolating Chroma from Luminance for keying better with poor footage
Are your mattes canceling each other out? Please see Tip to keep mattes from canceling out other mattes
How to key in DS using an alpha channel imported with video or a still
Problem: How do you replace the "fill" for an imported graphic with alpha in DS. It's something that I do often in Symphony or Media Composer by stepping into the graphic and cutting in moving video to replace the fill.
Solution: Place your file on the Timeline. Right click the clip and select Create Composite Container, or select the clip and simply press CTRL 8. Both will get you inside a composite container with you single source. In the effects tree area, add a Key Combiner Node. Feed your first source into the Key Combiner and feed that to the Output. Drag your second source, your new fill, to the effects tree and feed that also into your Key Combiner. Your new source will be affected by your original clips Alpha. Make sure you select Alpha for your first source, Luma for you second source.
In Layers:
Combine your new fill (the layer that is left) with the alpha of your graphic by: Grab hold of the track icon (very left of each track in the compositing timeline) of the track holding your graphic/alpha, and drag it to the alpha picture icon of the layer (the right hand picture icon of the layer). A second alpha picture icon will turn up to the right. You are able to scroll right and left to better view the alpha by dragging a horisontal bar next to the picture icons. Now you have combined them but there is a few more things left: You have to select wether to use alpha or fill part of your graphic/alpha clip in the operation. This you do by rightclicking on the very right (the new) alpha picture icon in the layer and select "alpha". Now it should be correct. All that is left now is to check that the alpha is beeing exported to the output of the compositing container. This is done by right-clicking on the container output picture icons above the layer picture icons and make sure export alpha is selected.
In the Effect Tree:
In the effect tree area below the layers (this is where you have two nodes, the first is the new fill clip and the second is the output of this area). Drag the track icon (as described above) of the graphic/alpha track and drag it in to this area. Place it below the left hand node. Rightclick the area (not the nodes) and "add effect". In the effects library (image effects), go up one level (out of the "image effects") and look for the "tree effects" folder. In the tree effects folder select "key combiner /alpha" and drag it in to the effect tree area of the compositing container. Make a connection between the "fill node" and the fill input of the "key combiner". Make a second connection between the "graphic/alpha node" and the alpha input of the "key combiner". Make a third connection between the "key combiner" output and the effect tree area "output node". Done. Now check alpha export on the compositing container output as described above.
(Thanks to Paul Sanni, Andi Loor and Sean Stall)
How to create a custom wipe without losing your mind
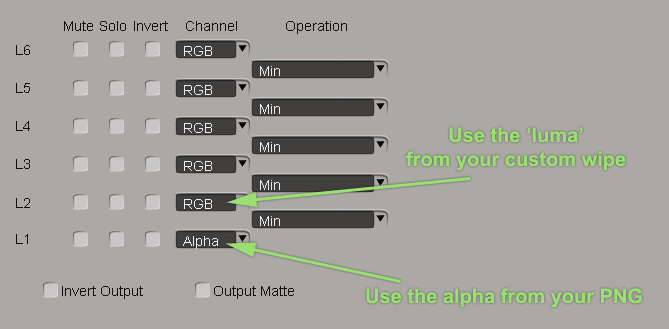
So you have a piece of text with an alpha (your PNG), that you want to wipe on using a black/white matte that you're painting. Yes?
If so, then a Key Combiner is not what you want. You want to keep the alpha of the PNG (the shape of the text/title) and instead reveal its alpha using ANOTHER alpha (your wipe). If that is the case, you want a Matte Composite.
See the tree below:

The 'Graphics' node represents your custom black/white wipe:

And the blue 'Title PNG' node represents your title/logo PNG with an alpha, which is captured un-premultipled (as PNGs usually are).
The result is:

The Matte Composite node should be setup as shown below:

(Thanks to Judy Ranelli and "Sexy" Bob Maple)
KEYFRAMES
KEYFRAMES in effects properties window:
GREEN Keyframe light: you are between keyframes
RED keyframe light—active keyframe
YELLOW keyframe light—a changed value but no keyframe has been set.
GRAY keyframe light. No animation has been set.
Set beginning and end keyframes first.
Use arrows at top to move between keyframes.
AUTO keyframe sets keyframes whenever you change a parameter. New keyframes
are made only for the parameter you are adjusting
To add a KF to a single parameter (rather than setting a global
KF which means view>animated parameters in the curve editor doesn't work in
a useful way) then just have autokey ON, highlight the value and press the
] or [ to blip the value down/up, which will add a KF.
With MANUAL Keyframes, you need to record a keyframe whenever you change
something. Keyframes will be recorded for EVERY parameter in the effect, regardless
of whether a value has been adjusted.
Revised: Feb 3, 2010 12:56 pm